Friday, December 12, 2014

Christmas tour

Hey everyone! I'm finally getting a few minutes to write a blog post. I love Christmas time, but sometimes it can get a little too busy! But I guess we just have to try to enjoy it in the midst of the business. I want to give you a small tour of my home and some Christmas decor that I've put out this year! I'm especially excited about my new deer head this year; although, he'll definitely be staying out year-round. 
Here he is in the dining room.


Here is my dining room table. I love to keep it set this time of year just so I can look at it!


This is a small tree in the corner of my dining room. It is real 😉 I've got it in an old box. 

This is also in my dining room. 

This is the table in my foyer. My rocking horse is another favorite of mine!

I chose to just hang a plain green wreath on my chalk board in my breakfast room.

Here is my living room.

This is the shelf over my tv.

Side table

Bookshelves

Mantle
Loving my new fur stockings!

I also chose to hang small wreaths that I made on some of my windows to add to the festivity. 
 I hope you enjoyed it!!! And would love your feedback! Now, I've got to run because I've got a party to get ready for!!! It's the most wonderful time of the year!


Saturday, October 11, 2014

Simply fall

My favorite time of year is finally here! I absolutely LOVE fall!! I tend to get a little obsessive with pumpkin though. Pumpkin spice lattes, pumpkin smoothies, pumpkin granola... You get the point. All that to say, even though I'm obsessive with all that, I do like to be very simple in my fall decor. I stick to the saying "less is more" when it comes to what I decorate with for fall. My favorite pumpkins are the heirloom pumpkins. The more unique the better! I just like the plain white ones the best! So, here are a few pictures from around the house:) enjoy!!


Thursday, October 9, 2014

Furniture makeover


Ok.. So I finally had a few minutes to sit down and share my most recent furniture makeover! This particular piece was given to us by my parents soon after we bought our first house. We used it as a TV armoire. Well, recently we got a new, bigger tv that would not fit in this stand. So, I decided to take it into the dining room, and use it as a catch-all cabinet:) 


Here's the finished product! I painted it Silver Mist by Sherwin Williams. I also took the top doors off so I could have some open shelving to use for some cute decor. I put beadboard on the back of the opening so that it looked like it was meant to be open. I mean, who doesn't love a little beadboard! I bought some new knobs at Hobby Lobby and Voila!


Wednesday, October 1, 2014

Coming soon!!!

Ok... I'm super embarrassed that I haven't blogged in so long! Life gets so hectic and crazy and I constantly have an ongoing project, so blogging gets put on the back burner! But no more!! I have got so many new projects to share with yall!! So, over the course of the next few days, I'll be blowing up my blog with all of our latest projects!! I'm super excited to share!! I'll also be sharing some fall decor ideas!! Although, I do like to keep it simple 😊 so stay tuned!!!

Thursday, April 3, 2014

Old sewing table transformation

I have been so excited to share this blog with you! I bought this old sewing table for next to nothing from a lady in my church. I couldn't wait to make it over!! 

Here's the before picture!
Aren't the details on the legs just beautiful?!
So, right when I got it, I knew exactly what I wanted to do to it! Chalk paint it! With my all time favorite color!! And then seal it to give it a little bit of a shine. 
Here's the after picture!
BIG transformation!
I don't think I've ever been this in love with a piece of furniture! It goes perfectly in my living room as a sofa side table:)

Saturday, March 22, 2014

Spring is here!

Oh how I love spring! To me, it represents new life! Christ raising from the dead; which is THE most amazing representation of new life! Then, we see flowers starting to bloom everywhere, birds singing beautiful melodies, and everyone just seems a little bit happier this time of year. So, speaking of new life,  I really wanted to do some crafting yesterday. I LOVE birds! So, I thought it would be fun to make a bird's nest with a few little eggs in it!

I started off by finding a very small (roughly 5-6" in diameter) grapevine wreath at Walmart for around $2.

Then, I went to Dollar Tree and got a bag of moss filler.


Then, I just started putting it all in and around the wreath. In no certain order because hey, it's suppose to look like a real nest.

I, then, found some really cute eggs at Stein Mart for around $5 a bag. 
 
Lastly, you just put however many eggs you want in your nest and Voila! It's that easy! 

I put mine on a pedestal/cake stand on my table in my foyer as part of a spring display:)


Friday, March 7, 2014

Vintage finds: Part 2

So, I've already explained my love for antiques and anything vintage in the previous blog. In this post, I'm just going to show you more of my favorite finds that I've got around the house. 
 
This first picture is of an old chest that I found at an antique store in Lake Village, Arkansas. I got a real steal on it! I thought it might be cute to throw a few pillows on it and viola!

I also LOVE antique butter crocks! I have three of them and they're each unique in their own way. This first picture is of one that ( yes, I will admit it) I found on the side of the road! It still had the churn stick and everything! I use it on my mantle to keep some pretty cotton in.

This next churn is one that I bought for super cheap because it had a small crack in it. But, hey, I didn't care, I use it for decor purposes anyway:) 

This last butter churn I'm going to show you is of one that I actually found in my grandparents barn. They have so many old things in this old barn. My Pappaw used to like to collect all these antiques and store them in there, which is a benefit to me:) This is probably my favorite churn out of them all. 

The last find I'm going to show you is an old door that I love. I found it at an outdoor junk sale. The doorknob is actually worth more than the door itself.  I use it as an eye-catcher in my upstairs hallway. I just leaned it up against the wall , and made a cute shelf with hooks to put on it. It also covers the big, ugly thermostat on the wall too :)

I hope that you enjoyed the post! Stay tuned for my next blog post very soon that will be all about pillows!!

Saturday, February 22, 2014

The secret is out! Part 1

I LOVE antiques! And one of my favorite things to do is to shop in antique stores and especially junk stores, because you never know what you're going to find. I could seriously be on one of those "picker" shows on tv. Some antiques can get a little pricey but that's where the secret comes in. The secret to getting good prices on antiques is to go to these hole in the wall junktiques, as I like to call them:) You have to find a place where the  people are fairly clueless about what they have. They are more worried about getting rid of some of the "junk" than making a pretty penny off of it. You can also hit up some auctions in your area, but I'm not too much of an auction girl. I get way too competitive at things like that, so it's probably safer for myself and everyone else that I not participate in them. Let's get started!
One of my favorite finds is my very old dresser drawer. I found it at a junk store in downtown Clinton, Ms. It is so old that when the store received the dresser that this belonged to, it pretty much disintegrated, so they ended up just keeping the drawers. I have yet to find any information on what kind it is or how old it is. I have it sitting on my hearth with a plant and an old quilt in it that I will talk about next.

The next thing is a real jewel in the rough. I also found it at the same store in Clinton. It is the gorgeous quilt in the picture below. It dates back to the 1920's. And get this! The store still had it's original box!! It was handmade by someone called "Granny's Quilts". The colors in it are so vintage! It is a real heirloom that I will pass down one day. I have it sitting in my old drawer that I talked about earlier.

The last thing I will be sharing about is my vintage fan that I adore ❤️ It is a genuine "Victor". It's worth a pretty penny:) I got it in one of my favorite junk stores in the Cooper Young District in Memphis, TN. I didn't pay much for it because they really didn't know what they had :) 
I hope you've enjoyed viewing some of my favorite vintage finds. This is part 1 of 2 blogs. Part 2 will be coming soon!

Thursday, February 13, 2014

DIY pillow patch

I'm sure you have an old throw pillow lying around or that one that you love but it's just too plain! Well I've got the perfect solution for you: put a patch on it! I'm doing "mr" and "mrs" pillows, but you can do anything you wish! The possibilities are really endless! It's simple, and it will definitely take your pillow from boring to tres chic! Need I say more? Let's get started!

Materials:
2 throw pillows
Burlap (the amount of material you need depends on the size patch that you're making)
Hot glue gun
Glue sticks
Stencils (I used 5 1/2 inch)
Paint or paint marker (I used black)
Sponge brush

Instructions:
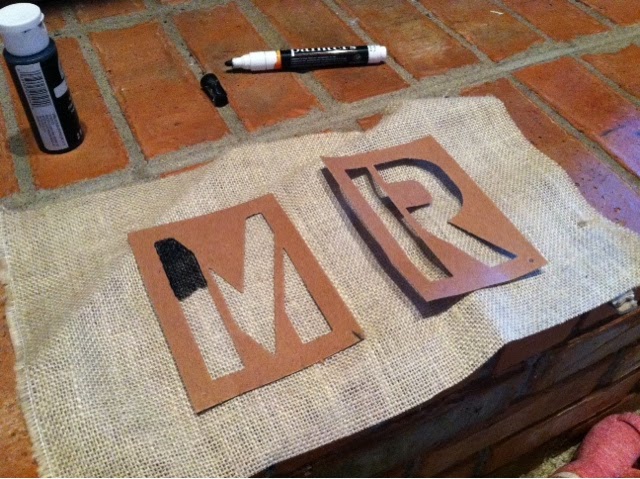
First, you need to paint the stencil on the burlap so it can be drying. Either by using a paint marker or black paint and a sponge brush.

Once that's done, you can set them aside and let them dry. 
Now you have time to go fix you a cup of coffee and relax for a few :) Or, if you have a very active toddler like I do, go fix you some coffee while chasing after your toddler and attempting to keep her away from the paint.
Once the paint is dry, trim up the burlap around the stencils. I left around a 2" space on each side of the letters.

Then, grab strands of the burlap on each corner to add some fray.
Once all four sides of the burlap are frayed, you are ready to grab your glue gun! You are going to need to measure your pillow so that your patch is centered. (I'm using a rectangular-shaped burlap pillow that I made, but you can use any pillow). Once you've measured, get it centered on your pillow, and get ready to glue! Slowly glue each side to the pillow, putting the glue right up next to the fray. Just don't glue the fray down, because once the pillow is finished, it adds extra texture. Be very careful, because it is HOT glue. Believe me, I'm the queen of hot glue gun burns.
Now, let it dry:)
Once it's dry, rub your fingers on the fray to make it stand up around all four sides.

Repeat these steps for both pillows:) 
And this should be your finished product!

Please let me know how yours turn out!! I'd love to see pics! And I'd love to hear if you made any alterations to the pattern! 
Enjoy!!! 


Tuesday, February 11, 2014

No more MSG!

So if you haven't already heard or seen, store-bought cream of chicken, mushroom, or pretty much cream of anything contains questionable ingredients.
Picture courtesy of www.foodfacts.com 

I don't know know about you, but I don't want at least half of these ingredients going in my body, and especially not my family's body! So, a while back, I decided to do a little research on my own, because I knew there had to be a way to make homemade cream of anything. Well, I did just THAT! And what I made was awesome! And it makes every recipe that you use a cream of soup in awesome! Here is the recipe that I use: 

Yield:
3 cups (about 2 cans)

Ingredients:
1 1/2 cups chicken broth ( I use the broth  from chicken that I boiled or I make my own with "Orrington Farms" all natural chicken bouillon)
1/2 tsp poultry seasoning
1/4 tsp onion powder (or fresh, diced onions)
1/4 tsp garlic powder (or fresh, minced garlic)
1/8 tsp black pepper
1/4 tsp parsley
Dash of paprika
1 1/2 cups fat free milk
3/4 cups flour

Instructions:
1. In a medium-sized saucepan, boil chicken broth, 1/2 cup of the milk, and the seasonings for a minute to two ( longer if using fresh onions or garlic)

2. In a bowl, whisk together the remaining 1 cup of milk and flour. Add to boiling mixture and continue whisking briskly until mixture boils and thickens.

*you can also add lemon pepper seasoning to give it a little more flavor

*you can make cream of mushroom by substituting beef broth for the chicken broth, adding fresh, sautéed mushrooms, or canned mushrooms, and by not adding the poultry seasoning.

If you have any questions, write in my comments section and I will answer your question ASAP!

http://www.foodfacts.com/NutritionFacts/Soups/Campbells-Cream-of-Chicken-Soup-0-oz/793

http://www.orringtonfarms.com/home-page/

Monday, February 10, 2014

Using old shutters

So, if you haven't noticed already, I have an obsession with old things. Any type of old decor, trinkets, you name it, I like it. Today, I'm sharing some of the ways that I have used old shutters that I've collected along the way. 
This first picture is of one I have hanging in my dining room. It is painted with a homemade chalk paint, sanded and then hung with pieces of burlap and rope. 


This is a really old shutter that came from an old house in Yazoo City. It was just so beautiful, I didn't have to do anything to it, except put it on display. It's leaned up against the corner of my hearth. It adds complexity and color to the corner of the room!


This is the last picture:) this one is hanging over my sofa in the living room. It's white-washed and then sanded. Then, I found a vintage knob at Hobby Lobby to put on it to add to the old look. I then used thick, sisal rope to hang it with from a hook! 

I hope you have enjoyed today's post! 

Www.hobbylobby.com